Monday, May 30, 2011

PASTA WITH TOMATO AND CREAM SAUCE

(English text is below. Türkçe tarif için buraya tiklayin)

Ok, this one might be no surprise to anyone, but it always works! I haven’t met a single person who doesn’t like pasta! 

This particular recipe is not something too difficult to make. It is quite basic and yet successful. However, I have to admit that I’ve never cooked pasta with cream sauce before. In my kitchen, pasta is either made with tomato sauce or with minced meat. The reason why I have never made pasta with cream is that cream is something I almost never buy in the first place. Yes, too fat. And tastes too good. We are addicted to good taste and I don’t want cream to become our guilty pleasure. The friendship should remain on a “hello, hello” basis and that’s all. 

Aaah, and having said that and having eaten a big plate of pasta tonight, I feel kind of guilty. I started to do sports regularly and somehow I feel guilty now. Ah well.

Ingredients (Serves 2-4)

250 grams of Bavette

I use Barilla Bavette


200 grams of cream
1 big tomato (or 2 medium ones), pureed
1 small onion, diced
2 teeth of garlic, minced
1 table spoon of grounded sweet red pepper


cream, tomato, onion, garlic and sweet red pepper
tomato pureed
3 spoons of olive oil
Purple basil to your liking

Method:
  1. Cook pasta according to the instructions on the package.  
  2. Sauté the onion and garlic in the olive oil for maximum two minutes.
  3. Pour in the tomato paste. Cook for 10 minutes over medium heat.
  4. Turn off the heat. Add the cream into the sauce and stir.  Stir in the purple basil and the grounded sweet red pepper.
  5. Stir in the pasta.

step 1
step 3


step 4
yummy ending!!!

Thursday, May 19, 2011

FENNEL FOLIAGE

(Text in English is below. Türkçe tarif için buraya tiklayin)

(KUZU ETLI ARAPSACI)

Today I didn’t feel like cooking dinner so I thought let’s order something: sushi? Kebab? Fish? While browsing the menus to choose, I saw “fennel with lamb’s meat” in one of the menus. Fennel? I have fennel leaves in the fridge as well as lambs meat! So back in the kitchen! 


Fennel has a strong aroma, so maybe not everybody’s favourite but we like it very much at home! This dish is quite rich: it has vegetables, meat and a yoghurt based creamy sauce (surprise, surprise J). And the strong aroma of the fennel is balanced with the rest of the ingredients in such a nice way! Already one of our favourites! 


Below you will find the details for the recipe: 

INGREDIENTS:


fennel leaves, carrot, onion, potato


250 grams fennel foliage washed and cut apart from its stem. Chop the leaves fine. 


fennel leaves cut apart from the stem


250 grams lambs’ meat cut in cubes


lamb's meat cut in cubes


1 big onion, chopped
1 medium carrot, sliced
1 small or medium potato, cut in cubes


carrot and potato chopped


200 grams yoghurt
1 egg
2 table spoons of flour
Juice of half a lemon
2,5 glasses of warm water

METHOD:

  1. Sauté the meat for a few minutes. Add the onion, continue sautéing for a minute. Then add the carrot and the potato.
  2. Add 1 glass of warm water and close the lid and cook till the meat is soft. You will see that the meat soaks almost half of the water.
  3. Add the fennel leaves and 1 glass of warm water. Cook till the fennel leaves are soft.
  4. While the fennel leaves are simmering, mix the yoghurt, the egg, flour and half a glass of warm water with the help of a blender.
  5. When the fennel leaves are cooked well enough for you (you will have to decide for yourself how soft you like them), take a spoon of the remaining water in the dish and add to the yoghurt mixture and mix it well. Do this a few times. The yoghurt mixture should now be ready to be added into the fennel dish! But you have to do it very carefully; very slowly and bit by bit. While you add the yoghurt mixture into the dish, you should stir the dish this time.
  6. Let it cook till it boils and then let it simmer for a few minutes.
  7. Add the salt the very last.

step 1
Step 3


Step 6
happy ending!!!

Tuesday, May 10, 2011

BORAGE

(HODAN, KALDIRIK)

borage


This is yet another wild plant that I got to learn thanks to the open air market in town. I had no idea how to use this plant in the kitchen so I had to do a bit of searching on the internet. The most common recipe turns out to be a very simple one yet so efficient! My husband frequently asks me to prepare it for him and with pleasure I do.

I think the season for borage starts in late march or early april if I remember correct. I see it on the stalls in the open air markets for a while already and almost every two weeks we have it on our dinner table. The first time I bought borage was the first time in this season that it was placed on the stalls and I have to admit that cleaning seemed a bit too difficult for me. The guy behind the stall told me to cut the blue flowers and just wash it a few times. The problem was that, as it is the stem and the root of a flower that we eat, there was dark soil on them which was quite stubborn to be cleaned away. The next week when I bought it again, I saw that cleaning was somewhat easier! I think this is because in one week the plant grew bigger and they did not have to pull it out from the soil as such.

Until now, I always cleaned the blue flowers and the leaves on the stem. Last weekend in the market, an old lady told me that nothing of borage I have to throw away! According to her, the flowers are the best part of borage. I have some half a kilo in my fridge now and I’ll give it a try without removing any part of it this time and I’ll let you know!

The dish contains eggs. I add fewer eggs than the recipes I saw on the internet because we are not really big fans of eggs! I highly recommend that you consume it with strained yoghurt to which a small tooth of garlic is crushed!! Just yummy! 

Ingredients:

Half a kilo borage, cleaned


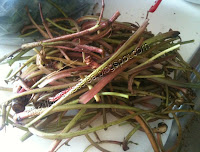
borage still needs to be washed


1 big onion, chopped
2 eggs

egg mix with salt and pepper


Salt and pepper
2 spoons of olive oil

Method
  1. Pressure-cook the borage stems for 20 minutes. If they are not soft enough for you, then pressure-cook some more. Chop in small bits like 1 or 2 cm.
  2. Sauté the onion in the olive oil. Add the chopped borage, and sauté till softer.
  3. Mix the eggs with salt and pepper. Add to borage and mix. After 1 or 2 minutes, the eggs should be ready.

step 1
step 1
step 1, borage cooked and chopped
step 2


happy ending!! (yes, I forgot to make a pic with the plate :-)

MADIMAK (KNOTGRASS)

(English recipe is below. Madimak tarifi için burayi tiklayin)

I heard of its name but I have never tasted it before: Madimak, in Turkish and Knotgrass in English (I hope it is the correct translation for it). Two weeks ago, I have seen it in the open air market for the first time. And it was only last weekend that I bought some to try and make something of this plant. 


My mom who joined us to the market, said that her grandmother cooked this plant for them frequently and that they loved it. I was silly enough not to ask for its recipe but to be honest, I don’t bother anymore. I trust internet! Though, I have to admit that the number of recipes available out there becomes fewer, the more uncommon is the ingredient. I found that they make either dish or either soup of the knotgrass here in Turkey. Some add pastrami, some don’t. Some recipes talk about lentil some don’t. I added, again, carrot and pepper. And I added both lentil and pastrami. I was careful about the amount of the pastrami that I added but if you like you can add more.

All in all, the result was good!


One more thing that I would like to mention is that, I did not remove the stalk of the plant as no recipe I found on the net mentioned so. And I regret that because the stalks are quite rough and does not entirely become soft after half an hour cooking. Next time, I’ll remove the stem as much as I can and try to make soup of it. I think it is worth to try then! Indeed, the stalks need to be picked and thrown away as they do not get soft at all (I steam-cooked a handful of the knotgrass stalks separately in the pressure cooker for half an hour in order to see if they'd get soft at all, but they dont't). The lady at the bazaar also told me that the knotgrass dish made with the leaves only. So, the pictures you see below have the stalks which disturbed us while eating; but next time it'll be without! Anyway, I'd like to note that there's an alternative recipe (slighltly different) for knotgrass and it's with sujuk and bulgur. To see the recipe, please click here


Ingredients (serves 6)


Half a kilo knotgrass, the stalks are removed, the leaves washed and drained and chopped fine

knotgrass (madimak) chopped fine


Two medium sized onion, chopped

2 spoons of green lentil, boiled

1 carrot, sliced thin

1 green pepper, sliced thin

3 spoons of bulgur

5 slices of pastrami, chopped fine  


pastrami that needs to be chopped fine


2 glasses of warm water

3 spoons of olive oil

1 spoon of tomato paste (Turkish: domates salçası)

Half a spoon of or less pepper paste (Turkish: biber salçası)


Method:
  1. Sauté the onions for 5 minutes in the olive oil. Add the carrot and pepper and sauté a few minutes more.
  2. Add the tomato and pepper paste and sauté some more. Add the pastrami and continue sautéing.
  3. Add the knotgrass, the bulgur and the green lentil by mixing it with the rest of the ingredients. Add warm water. Close the lid to cook for about half an hour.


step 2
step 3


happy ending!!!

happy ending!!!


Smakelijk!!!

Tuesday, May 3, 2011

SIVEYDIZ

This is one of our favourite dishes of my husband and me. A couple of days ago, I posted the recipe with the green almonds and fava beans (see here). This recipe is almost the same; however prepared with green garlic instead and it is much tastier, I have to admit!  

The season for the fresh garlic is April. End of March I have seen it already on the stalls in the open air markets; however, these days, when you bring a visit to the market, fresh garlic will make sure you know he’s there! Such an odour with such self-confidence :-) 


green garlic


To talk about the dish, it is a local dish of Gaziantep. This city has just hundreds of great recipes, and siveydiz is just one of these. I got to learn the dish from a local restaurant which serves Anatolian cuisine and since then I am a big fan of it (both of the restaurant and of the dish itself)

Here’s the recipe:

Ingredients:

300 grams of meat, cut in cubes
20 green garlic sliced 2-3 cm. each. The upper white parts and the green leaves we will keep separately

green garlic cut


Half a glass of chickpeas, boiled
300 grams strained yoghurt
2 table spoons of flour 
1 egg
1 liter water (5 big glasses of water)
False saffron
Salt

Method:

  1. Pressure-cook the meat with 400 ml. water (about 2 big glasses) for 20 minutes. If not soft enough, pressure-cook 5 minutes more.
  2.  When the meat is cooking, you can work with the yoghurt. Add the cold water to the yoghurt and mix till creamy and soft. Then add the flour and break the egg in it. It is very important that this mixture is evenly mixed so I prefer to mix it by the help of my blender.
  3. Add the meat in the pressure cooker, the chickpeas and cook for 5 minutes more (I don’t bother with pressure cooking at this moment as the chickpeas are already soft.)
  4. Add the white parts of the green garlic and pressure cook for 5 minutes. After that, we will turn off the cooker. Add the green parts of the green garlic and mix.
  5. Time to cook the yoghurt. This is a process in which you have to be very careful otherwise the yoghurt will lose its even texture. We will pour the yoghurt mixture in a pan and heat the pan in low heat. We will continuously stir the yoghurt mixture until it boils and this always following the same direction. Otherwise you will lose the creamy texture. When the mixture boils, you can turn off the fire.
  6. Another step that we will have to be careful about is that when we add the yoghurt mixture to the vegetable and meat that we cooked. It is all about to have a nice texture with the yoghurt!
  7. Before you pour the yoghurt mixture into the pot with the meat and the vegetables, add a spoon of the broth to the yoghurt mixture and mix it well. You can do this a couple of times. And then you pour the yoghurt mixture into the pot with the meat and the vegetables. Don’t forget to stir fast when you do that!
  8. Now, you can add the salt to your liking.
  9. The last step is about the decoration: for that we heat a saucepan and melt the butter in it (As I don't want the butter to burn, I always add a few drops of olive oil to the butter). Then add the false saffron and fry it a bit. This you can pour it on the dish. 

    meat ready to be cooked (step 1)


    everything mixed (step 7)


    siveydiz ready to be served
    false saffron fried in butter (step 9)

    happy ending!!!